Showing posts with label Programing Articles. Show all posts

Saturday, February 13, 2010

Seperating C++ template declaration and implementation

The following question was the inspiration for this short article:"Splitting a template and class into definition and declaration.". In this question the asker asks, "I have the code below, which is all well and good but I'd like to move the definition of the setListener method to the cpp file, yet I seem to be having difficulty doing this as I get complaints about the template needing arguments?".

1:
2:
3:
4:
5:
6:
7:
8:
9:
10:
template
class CEventRaiser{
public:
typedef void (TEventHandlerClass::*TEventHandlerMethod)();
void setListener(TEventHandlerClass *aEventHandlerClass, TEventHandlerMethod aEventHandlerMethod){
eventHandlerClass=aEventHandlerClass;
eventHandlerMethod=aEventHandlerMethod;
}
};


It's a fair question but, unfortunately, the answer isn't straightforward. Let's see if we can unravel this mystery.

Before we go any further, I should point out this article is not targeted at someone who knows nothing about C++ templates, compilers or linkers. You need to have at least a basic understanding of these three topics otherwise what follows is likely to make little sense. Since these are all outside the scope of this article I leave it up to the reader to do their own research. At the very least, this article assumes you have at least a basic understanding of C++ templates. If not please refer to the following tutorials:

CPlusPlus.com:
http://www.cplusplus.com/doc/tutorial/templates/

C++ FAQ Lite
http://www.parashift.com/c++-faq-lite/templates.html

One of the things that often confuses an inexperienced C++ programmer, when first using templates, is why they can't put the declarations in the header file and the implementation in the .cpp file, just like they can with normal function or class definitions.

When C++ programs are compiled they are normally made up of a number of .cpp files with additional code included via header files. The generic term for a .cpp file and all of the headers it includes is "translation unit". Roughly speaking, a compiler translates the translation unit directly into an object file, hence the term translation unit.

Once all the translation units have been turned into object files it is the job of the linker to join all these object files together into one executable (or dynamic library). Part of the linking process is to resolve all symbols to ensure, for example, that if an object file requires a function, that it is available in one of the object files being linked and that it doesn't exist more than once (it should only be defined by one object file). If a symbol can't be resolved by the linker a linking error will result. Up until the point of linking each translation unit and resultant object file are completely agnostic, knowing nothing about each other.

So what does this have to do with templates? Well to answer this we need to know how the template instantiation process works.. It turns out that templates are parsed, not once, but twice. This process is explicitly defined in the C++ standard and although some compilers do ignore this, they are, in effect, non-compliant and may behave differently to what this article describes. This article describes how template instantiation works according to the current C++03 standard. Let's take a look at what each of these passes does:


1. Point of Declaration (PoD)

During the first parse, called the Point of Declaration, the template compiler checks the syntax of the template but does not consider the dependent types (the template parameters that form the templates types within the template). It is like checking the grammar of a paragraph without checking the meaning of the words (the semantics). Gramatically the paragraph can be correct but the arrangement of words may have no useful meaning. During the grammar checking phase we don't care about the meaning of the words only that the paragraph is syntactically correct.

So consider the following template code...

1:
2:
3:
4:
5:
6:
template 
void foo(T const & t)
{
t.bar();
}


This is syntactically sound; however, at this point we have no idea what type the dependent type T is so we just assume that in all cases of T it is correct to call member bar() on it. Of course, if type T doesn't have this member then we have a problem but until we know what type T is we don't know if there is a problem so this code is ok for the 1st pass.

2. Point of instantiation (PoI)

This is the point where we actually define a concrete type of our template. So consider these 2 concrete instantiations of the template defined above...

1:
2:
3:
foo(1); // this will fail the 2nd pass because an int (1 is an int) does not have a member function called bar()
foo(b); // Assuming b has a member function called bar this instantiation is fine


NB. it is perfectly legal to define a template that won't be corrected under all circumstances of instantiation. Since code for a template is not generated unless it is instantiated the compiler will not complain unless you try to instantiate it.

Now both the syntax and the semantics of the template are checked against the known dependent type to make sure that the generated code will be be correct. To do this the compiler must be able to see the full definition of the template. If the definition of the template is defined in a different translation unit from where it is being instantiated the compiler has no way to perform this check, so the template will not be instantiated. Remember that each translation unit is agnostic; the compiler can only see and process one at a time. Now, if the template is only used in one translation unit and the templated is defined in that translation unit this is not a problem. Of course, the whole point of a template is that it is generic code so there is a very good chance it will be used in more than one place.

So, let's recap where we are so far. If the template definition is in translation unit A and you try to instantiate it in translation unit B the template compiler will not be able to instantiate the template because it can't see the full definition so it will result in linker errors (undefined symbols). If everything is in one place then it will work. but it is not a good way to write templates. Sooner or later you'll probably end up using the template in other translation units because it is highly unlikely (although not improbable) that you'd go to all the effort of creating a generic template class/function that you'll only ever use in one place.

So how do we structure our code so that the compiler can see the definition of the template in all translation units where it is instantiated? The solution is really quite simple, put the templates definition somewhere that is visible to all PoIs and that is, of course, in a header. The header file can be included in both translation unit A and translation unit B so it will be completely visible to the template compiler in both.

It's interesting to note that the C++ standard does define the "export" keyword to try and resolve this issue. The idea is that you prefix the declaration of the template with the export keyword, which will tell the template parser to remember the definition for later reuse. It was introduced as a last minute addition to the standard and has yet to be adopted by any main stream compiler.

From a style point of view, if you want to preserve demarcation between declaration and definition with template classes you can still separate the class body and the member functions all in the same header.

1:
2:
3:
4:
5:
6:
7:
8:
9:
10:
11:
12:
13:
// First class declaration
template
struct CTimer
{
void foo();
}

// Followed by function definitions
template < typename T>
void CTimer ::foo()
{
}


On the rare occasion that your template class/function is only going to be used in one translation unit then the declaration and definition should go in there together in an unnamed namespace. This will prevent you, later, from trying to use the template somewhere else and scratching your head trying to figure out why you have linker errors about unresolved symbols Putting the template fully in the translation unit means it won't even compile if you try to reference it and the reason for that will be far more obvious.

1:
2:
3:
4:
5:
6:
7:
8:
9:
10:
11:
12:
13:
14:
15:
// My .cpp with a template I never plan to use elsewhere
namespace
{
template
struct LocalUseOnly
{
void foo();
}

template < typename T>
void LocalUseOnly::foo()
{
}
}


Now, as usual with C++, things are not as straight forward as they could be because there is an exception to this rule about putting template code in headers. The exception is specializations. Since specializations, unlike templates themselves, are concrete entities (not templates that describe to the compiler how to instantiate a concrete entity implicitly) they have associated linker symbols so they must go into the .cpp file (or be explicitly declared inline) otherwise they'll breech the "One Definition Rule". Also, specializations of template class member functions must be outside the class, they cannot be implicitly inline within the class body. Unfortunately, Visual Studio doesn't enforce this... it is wrong, the C++03 standard clearly states they must go outside the body.

As a final note, there are other ways this issue of template declaration/definition seperation can be resolved (such as putting the template definition in a .cpp file, that you then include when needed); however, none of these are as simple or straightforward as just leaving the code definition in the header, which is the generally accepted best practice.

I hope this article has helped demystify why templates are generally defined in header files, contrary to normal good coding practice.

For more on C++ templates I recommend the C++ Templates FAQ

Single Database or Multiple Databases [x] Community Pick Community Pick is worth 500 points, assigned to Articles that earned 10 net helpful votes, and/or deemed helpful by a Page Editor.

One database for all clients or One Single database for each client

In today's IT Situation, many firms large or small have difficult in making decisions either to use single database for all the clients or one database for each client.  Since both have their own pros and cons, it is tricky when some factors like licensing, hardware, hosting costs involve.  The advantages and disadvantages of both options are listed below.

The word "Client" could easily be interchanged with Customer, though, it can also mean individual work stations in a large development environment such as a software house. Whilst some of the pros and cons equally apply to both situations, the intention here is in reference to individual Customers.

Advantages of Single Database for each client

  • Performance is expected to be better with own databases. And it would be easier to move a customer that uses the system a lot to a separate set of servers. It is also fault tolerant, since only their own data exist in the database.
  • If the client needs direct access to all their data;  in such an application it is obvious that each client needs to have their own database.
  • For rapid development, using single database per customer is advisable. So it will be easy for the administrator to backup, restore, or delete a customer's data. So whenever the existing customer's subscription is expired, the database can be backed up and moved to the separate location.
  • If the business plan is to have lots of small customers but with huge volumes of data, then single DB for each client is advisable.
  • Clients typically feel safer with data isolation (at least they would probably not feel secure knowing their data is "side by side" with other companies' data )
  • Single database can be easily Administered and Managed
  • In terms of security, single database for each client is highly secured
  • Single database can be Quickly implemented and Performance is rather good
  • It is very easy to build new modules and add new features. No need to wonder, where to fetch data.
  • Easy to operate - it's either working or not. It's actually Mark Twain's Dumbhead Walton principle: "Put all eggs in same basket and then be extremely careful".
  • Single database have Higher resistance against data crashes
  • In Single database each and every application remains unique or at least not dependent on others.
  • If one application crashes, then database of other applications will not be impacted.
  • Multiple databases are necessary if the site/application needs to be highly scalable (e.g. internet scale). For example, host each database on a different physical server
  • If we think that an application might grow so much in little time. it is better to use different database for each client.


Disadvantages of Single database for each client

  • Maintaining multiple databases is difficult. For example if we want to modify a table then we should do changes in all databases.
  • Backup of data is not easy. We should do a separate backup for each database
  • should pay for each database space for some providers


Advantages of Single Database for all clients

  • Less Cost
  • Grouping of data into multiple databases each with a significantly fewer number of tables.
  • It is easier to maintain only one database instead of several. It is also a bit easier to collect statistics about the usage of the application if the database is shared. Administrator application is easier to develop as well
  • In terms of flexibility, it's much simpler to use a single database with a single copy of the tables.
  • It's easier to add new features
  • It's easier to manage.


Disadvantages of Single Database for all clients

  • If any Maintenance activity or Database is lost, then all applications will have difficulties to run
  • A single database would most likely have a single set of servers, meaning one location. Connecting to those servers becomes slower based on numerous factors. The network needs to be robust and fast. The number of users could slow down a system that isn't scaled correctly.
  • We can't take the database offline or down since all applications are running.
  • If we want to do a backup and restore the database and give it to a set of clients running a single application, it will contain all client database information which is unnecessary
  • Running into security threats and vulnerability is high
  • Any query referencing this type of database will have performance impact
  • More space is needed for overhead required to create a database and backing up a database
  • With multiple customers in a single database, every SQL query is going to need to ensure that the data for the correct customer is chosen. That means that the SQL is going to be harder to write, and read, and the DBMS is going to have to work harder on processing the data, and indexes will be bigger
  • Running accounting systems for different companies will not be acceptable, since no client will entertain this
  • Application development is Harder. We need to keep track of every customer records.
  • Less fault tolerant.
  • Harder to move a customer to a separate set of servers if one customer is using much of the server resources
  • For better performance we should ensure proper indexes and keys are used.
  • Its harder to remove non existing clients records


Conclusion There are situations where either model might be preferable to match your requirements. However, you do need to consider all the pros and cons, which may include some / all / more of the above list, and make an informed and calculated decision. I hope this helps you in making some of those decisions.

Windows Drivers

Find out what hardware you have and get the most up to date drivers from the manufacturer!

Automatically Get Your Drivers
There is a number of great programs that will detect your hardware and find drivers for you automatically!
Here is a link to a pair of great driver detecting programs:

1. http://www.zhangduo.com/unknowndeviceidentifier.html
2. http://halfdone.com/ukd/

You can take this information to the website http://www.pcidatabase.com and find the specific device information for the drivers, then go to the manufacturer website and see if they make drivers for your OS, some hardware is OS specific and the manufacturer may not have driver support for your OS.

*Once you are in the Vendor and are searching for the Device you can hold CTRL and press 'F'.
-This is the Find feature, type in the Device ID and it will find it much quicker, since some pages are quite long.

Manually Get Your Drivers
1. Right Click on My Computer, Left click on Manage.
2. Click on Device Manager, you should notice on the right hand side icons with a yellow symbol next to them, this shows the device is unknown, or drivers are not installed. (assuming you are looking for drivers you do not have)
3. Right click a device you are looking for, left click on properties.
4. Click on the Details tab on the top of the menu that popped up.
5. You should see some code in the middle that looks similar to this:
           "PCI\VEN_14E4&DEV_169C&SUB
SYS_308&"
The important pieces are:
  VEN_14E4    is    Vendor 14E4
  DEV_169C    is    Device 169C    for     Vendor    14E4

You can take this information to the website http://www.pcidatabase.com and find the specific device information for the drivers, then go to the manufacturer website and see if they make drivers for your OS, some hardware is OS specific and the manufacturer may not have driver support for your OS.

*Once you are in the Vendor and are searching for the Device you can hold CTRL and press 'F'.
-This is the Find feature, type in the Device ID and it will find it much quicker, since some pages are quite long.

*Be careful in using different drivers as the can cause system instability and/or damage. However - if you believe you are capable, are sure it will work, or have no other options and just don't care you can try...
A similar version of the driver.
(Example) You have Windows 7 64-bit, but the manufacturer does not have drivers for Windows 7 - you can try Vista 64-bit)
When doing this you should stick with similar technologies. If you run a 32-bit OS stay with 32-bit drivers, same with 64-bit. If you are unsure of what you are running: Right Click on My Computer, on the page that opens up it should mention what version and service pack of Windows you are running. If you are running a 64-bit version of Windows it will say so. If it does not say anything pertaining to 32-bit or 64-bit, then you are most likely running 32-bit.

Windows Task Manager - Memory Performance Explained

Hello All,

This one should come in pretty handy while dealing with day to day issues with the very famous Windows Box . Almost 3 out of 10 calls you hear is about memory utilization in most of the cases (a rough estimate based on the experience till date). So what is all this fuss about Memory  management and troubleshooting. The word troubleshooting is just an catalyst to this article since its going to be an altogether different ball game.

So let's begin with exploring "that" specific tool which almost most of us are aware of and tend to fetch the very first thing when we want to analyze the memory issues on a windows system. You are right, am talking about our very own "Windows Task Manager". Some might ask what's the big deal about "Task Manager"? Yes exactly, but how many of us really know what those specified numbers actually mean?

Below is a brief explanation of the fields that's shown in the "Performance" tab of Windows Task manager.

CPU Usage - This is pretty obvious, it indicates the percentage of processor cycles that are not idle at the moment.

PF Usage - Indicates the percentage of the paging file that is currently being used. This value is sort of misleading, it actually shows the amount of physical memory/page file space being used by your system. Synchronous to Total under Commit Charge (K).

CPU Usage History - Just a graph which indicates how busy the process has been recently, the number of graphs correspond to the number of cores your processor has.

Page File Usage History - Same as CPU Usage History just for your page file usage since Task Manager has been opened.

That was about the "Graphs" displayed in the "Performance" tab  of WTM. Now let's look at the fields arranged in the different zones in WTM. The attached file summarizes the same. The ones marked in red are of more importance.


After all the brief up above, you might wonder so what to do with all these figures? So here is a small checklist that you could follow while dealing with system memory issues.

* If the "Commit Charge - Total" value regularly exceeds the "Physical Memory - Total" value, your system has to rely more frequently on the much slower page file (virtual memory). It's time to add more physical memory.

* If the "Commit Charge - Total" value is near the "Commit Charge - Limit" value then, not only did you use up all your physical memory but also you used up all your virtual memory. Your computer is at its knees begging for mercy.

* If your "Commit Charge - Peak" value is near the "Commit Charge - Limit" value then you are completely maxing out at one point or another during your computer being turned on. Your computer is at its knees begging for mercy once in a while for a few seconds again.

* If your "Commit Charge - Peak" value comes close to or exceeds the "Physical Memory - Total" value, your computer had to access virtual memory once or twice. Performance might not be affected, but you are at the upper limit of using all your memory.

* More than 50% of the core operating system components and drivers can be swapped out from physical memory to the page file, moving such portions of the OS can significantly yield a performance hit. This again indicates the advantage of using more physical memory.


The above article was indeed taken from a pretty good number of other "Performance Management" stuff on the net, but tried to collate the best of the information from them and blend it to one single piece of write up.


Happy Learning,

Rudram (^_^)


The Performance Tab of Windows Task Manager

Windows Virtual PC and XP Mode [x] Community Pick Community Pick is worth 500 points, assigned to Articles that earned 10 net helpful votes, and/or deemed helpful by a Page Editor. [x] EE Approved EE Approval is worth 4,000 points, assigned to Articles that are considered a valuable resource in the zone they're published.

If you have one of these versions of Windows 7 installed, then you can download two new free features called Windows Virtual Pc, and Virtual XP Mode:

- Windows 7 Professional
- Windows 7 Enterprise
- Windows 7 Ultimate.

Windows Virtual Pc is an updated version of a previous free Microsoft product called Virtual Pc 2007. Virtual XP Mode is a free download of a Windows XP Professional virtual machine, updated to Service Pack 3. The combination of the two products allows small or medium-sized business customers to run those XP programs that have not been made available in a Windows 7 compatible version by using a virtual machine which is a fully licensed XP Pro installation. Microsoft is adding this feature to the above Windows 7 versions as "a new optional component for the Windows 7 operating system that you can use to evaluate and migrate to Windows 7 while maintaining compatibility with applications that run on older versions of Windows."

A bonus of using both programs in your Windows 7 machine is that any programs you install in the virtual machine are automatically added to the Windows 7 Start Menu, so accessing these non-Windows-7-compatible programs in Windows 7 couldn't be easier...

The XP virtual machine that you download from Microsoft has Internet Explorer 6 built in, so if you found you had to keep using IE6 for certain purposes and turning down the Windows Update prompts for installing IE7 (or IE8), you no longer have to worry about that either. IE6 will not automatically be added to the Windows 7 Start Menu, but you can get it to do so if you copy a shortcut for it to the All Users Start Menu in the XP virtual machine.

The Windows Virtual Pc and Virtual Windows XP programs can be downloaded from Microsoft either in a 32-bit version or a 64-bit version, depending upon what your pc requires. You first install the Virtual Pc program and then install the virtual XP machine. The latter will be configured with a user name of "User", and during the setup you provide the password you want to assign the user. You will also be asked during the XP setup process to configure Automatic Updates.


The new Windows Virtual Pc, like the previous Virtual Pc 2007, allows integration between your host Windows 7 operating system and the virtual XP OS (what is called the "guest OS"), in that you can freely use your mouse to drag and drop files between the host and guest systems. And you can access a combined Windows clipboard of the host OS and the guest OS by copying and pasting between them. Unlike Virtual Pc 2007, you now get support for some USB devices like printers, external drives, flash cards and smart card readers. A new USB menu in the Windows Virtual Pc allows you redirect other USB peripherals to the virtual machine.


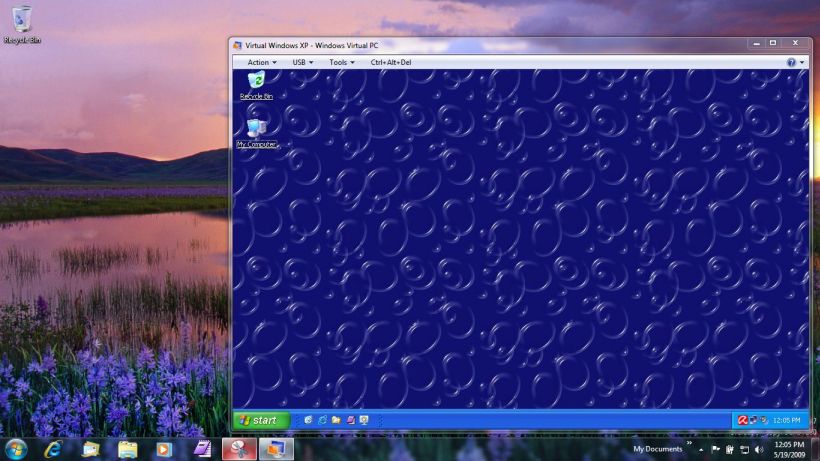
To get to the XP virtual machine, you can click on the new item in the Windows 7 Start Menu called Virtual Machines (under the folder All Programs -> Windows Virtual PC), which will then show you a folder with that name. Double clicking on the XP virtual machine starts it, after displaying a small window with messages about the progress: initializing virtual machine, and enabling integration features, for example. The latter process is what, among other things, allows you to move your mouse between the host machine and the guest machine for dragging and dropping of files.


Virtual Windows XP
195585


The menu bar of Windows Virtual PC has five items on it:

- Action menu, allowing you to View Full Screen, Sleep, Restart, or Close
- USB menu, showing you recognized USB devices
- Tools menu, allowing you to Disable Integration Features or access/modify Settings of the virtual machine
- Ctrl-Alt-Del, which is what you use to do a Ctrl-Alt-Del within the virtual machine rather than the host OS
- a little question mark icon at the end provides a Help menu.

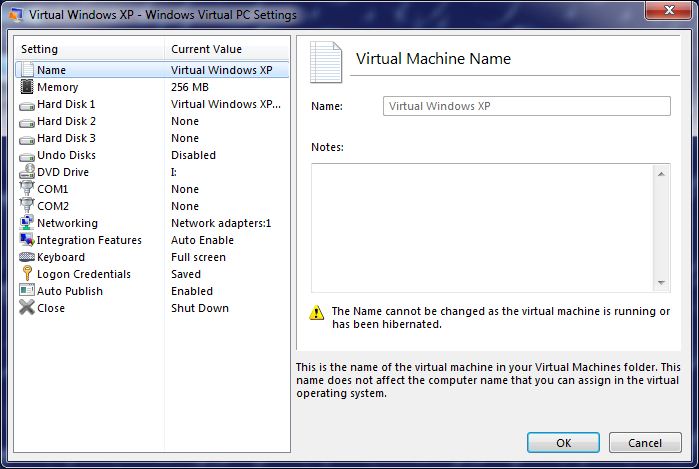
When you click on the Close box (X) at the top right of the Windows Virtual Pc window, the default action will be to hibernate the virtual machine, but in the Settings dialog box you can change it to Shut Down or Turn Off, or to Prompt for action.

Here is a screen shot of the Windows Virtual PC Settings dialog box.


Virtual Windows XP settings
195588


Monday, February 8, 2010

Seperating C++ template declaration and implementation

The following question was the inspiration for this short article:"Splitting a template and class into definition and declaration.". In this question the asker asks, "I have the code below, which is all well and good but I'd like to move the definition of the setListener method to the cpp file, yet I seem to be having difficulty doing this as I get complaints about the template needing arguments?".

1:
2:
3:
4:
5:
6:
7:
8:
9:
10:
template
class CEventRaiser{
public:
typedef void (TEventHandlerClass::*TEventHandlerMethod)();
void setListener(TEventHandlerClass *aEventHandlerClass, TEventHandlerMethod aEventHandlerMethod){
eventHandlerClass=aEventHandlerClass;
eventHandlerMethod=aEventHandlerMethod;
}
};


It's a fair question but, unfortunately, the answer isn't straightforward. Let's see if we can unravel this mystery.

Before we go any further, I should point out this article is not targeted at someone who knows nothing about C++ templates, compilers or linkers. You need to have at least a basic understanding of these three topics otherwise what follows is likely to make little sense. Since these are all outside the scope of this article I leave it up to the reader to do their own research. At the very least, this article assumes you have at least a basic understanding of C++ templates. If not please refer to the following tutorials: 

CPlusPlus.com: 
http://www.cplusplus.com/doc/tutorial/templates/

C++ FAQ Lite
http://www.parashift.com/c++-faq-lite/templates.html

One of the things that often confuses an inexperienced C++ programmer, when first using templates, is why they can't put the declarations in the header file and the implementation in the .cpp file, just like they can with normal function or class definitions.

When C++ programs are compiled they are normally made up of a number of .cpp files with additional code included via header files. The generic term for a .cpp file and all of the headers it includes is "translation unit". Roughly speaking, a compiler translates the translation unit directly into an object file, hence the term translation unit.

Once all the translation units have been turned into object files it is the job of the linker to join all these object files together into one executable (or dynamic library). Part of the linking process is to resolve all symbols to ensure, for example, that if an object file requires a function, that it is available in one of the object files being linked and that it doesn't exist more than once (it should only be defined by one object file). If a symbol can't be resolved by the linker a linking error will result. Up until the point of linking each translation unit and resultant object file are completely agnostic, knowing nothing about each other.

So what does this have to do with templates? Well to answer this we need to know how the template instantiation process works.. It turns out that templates are parsed, not once, but twice. This process is explicitly defined in the C++ standard and although some compilers do ignore this, they are, in effect, non-compliant and may behave differently to what this article describes. This article describes how template instantiation works according to the current C++03 standard. Let's take a look at what each of these passes does:


1. Point of Declaration (PoD)

During the first parse, called the Point of Declaration, the template compiler checks the syntax of the template but does not consider the dependent types (the template parameters that form the templates types within the template). It is like checking the grammar of a paragraph without checking the meaning of the words (the semantics). Gramatically the paragraph can be correct but the arrangement of words may have no useful meaning. During the grammar checking phase we don't care about the meaning of the words only that the paragraph is syntactically correct.

So consider the following template code...

1:
2:
3:
4:
5:
6:
template 
void foo(T const & t)
{
t.bar();
}


This is syntactically sound; however, at this point we have no idea what type the dependent type T is so we just assume that in all cases of T it is correct to call member bar() on it. Of course, if type T doesn't have this member then we have a problem but until we know what type T is we don't know if there is a problem so this code is ok for the 1st pass.

2. Point of instantiation (PoI)

This is the point where we actually define a concrete type of our template. So consider these 2 concrete instantiations of the template defined above...

1:
2:
3:
foo(1); // this will fail the 2nd pass because an int (1 is an int) does not have a member function called bar()
foo(b); // Assuming b has a member function called bar this instantiation is fine


NB. it is perfectly legal to define a template that won't be corrected under all circumstances of instantiation. Since code for a template is not generated unless it is instantiated the compiler will not complain unless you try to instantiate it.

Now both the syntax and the semantics of the template are checked against the known dependent type to make sure that the generated code will be be correct. To do this the compiler must be able to see the full definition of the template. If the definition of the template is defined in a different translation unit from where it is being instantiated the compiler has no way to perform this check, so the template will not be instantiated. Remember that each translation unit is agnostic; the compiler can only see and process one at a time. Now, if the template is only used in one translation unit and the templated is defined in that translation unit this is not a problem. Of course, the whole point of a template is that it is generic code so there is a very good chance it will be used in more than one place. 

So, let's recap where we are so far. If the template definition is in translation unit A and you try to instantiate it in translation unit B the template compiler will not be able to instantiate the template because it can't see the full definition so it will result in linker errors (undefined symbols). If everything is in one place then it will work. but it is not a good way to write templates. Sooner or later you'll probably end up using the template in other translation units because it is highly unlikely (although not improbable) that you'd go to all the effort of creating a generic template class/function that you'll only ever use in one place.

So how do we structure our code so that the compiler can see the definition of the template in all translation units where it is instantiated? The solution is really quite simple, put the templates definition somewhere that is visible to all PoIs and that is, of course, in a header. The header file can be included in both translation unit A and translation unit B so it will be completely visible to the template compiler in both.

It's interesting to note that the C++ standard does define the "export" keyword to try and resolve this issue. The idea is that you prefix the declaration of the template with the export keyword, which will tell the template parser to remember the definition for later reuse. It was introduced as a last minute addition to the standard and has yet to be adopted by any main stream compiler.

From a style point of view, if you want to preserve demarcation between declaration and definition with template classes you can still separate the class body and the member functions all in the same header.

1:
2:
3:
4:
5:
6:
7:
8:
9:
10:
11:
12:
13:
// First class declaration
template
struct CTimer
{
void foo();
}

// Followed by function definitions
template < typename T>
void CTimer ::foo()
{
}


On the rare occasion that your template class/function is only going to be used in one translation unit then the declaration and definition should go in there together in an unnamed namespace. This will prevent you, later, from trying to use the template somewhere else and scratching your head trying to figure out why you have linker errors about unresolved symbols Putting the template fully in the translation unit means it won't even compile if you try to reference it and the reason for that will be far more obvious.

1:
2:
3:
4:
5:
6:
7:
8:
9:
10:
11:
12:
13:
14:
15:
// My .cpp with a template I never plan to use elsewhere
namespace
{
template
struct LocalUseOnly
{
void foo();
}

template < typename T>
void LocalUseOnly::foo()
{
}
}


Now, as usual with C++, things are not as straight forward as they could be because there is an exception to this rule about putting template code in headers. The exception is specializations. Since specializations, unlike templates themselves, are concrete entities (not templates that describe to the compiler how to instantiate a concrete entity implicitly) they have associated linker symbols so they must go into the .cpp file (or be explicitly declared inline) otherwise they'll breech the "One Definition Rule". Also, specializations of template class member functions must be outside the class, they cannot be implicitly inline within the class body. Unfortunately, Visual Studio doesn't enforce this... it is wrong, the C++03 standard clearly states they must go outside the body.

As a final note, there are other ways this issue of template declaration/definition seperation can be resolved (such as putting the template definition in a .cpp file, that you then include when needed); however, none of these are as simple or straightforward as just leaving the code definition in the header, which is the generally accepted best practice.

COM Elevation: Make Your Program UAC-Aware

Whether you're a student, hobbyist, or serious developer this tutorial will leave you with a great understanding of how to implement User Account Control elevations in your application. If you have ever used an operating system from Vista and above you are probrably familiar with that shield icon on Windows dialogs and even on some of the daily applications you may use. The tutorial will show you how applications can be UAC aware.


What is COM Elevation?
The simplest way to explain it would be executing  code that runs in the context of an administrator. If you need to perform a few tasks that require administrative rights then use COM elevation. It's not neccesary to manifest your applications if your application doesn't need administrative rights "all the time". 

The tutorial uses Visual Studio 2008 Professional and the .NET 3.5 framework.
You can find the complete project solution template at the end of this article.  You may use it as a building block for adding COM elevations to your applications.

1
Creating the project

On the Visual Studio 2008 IDE [menu] choose File > New > Project...
Choose from the [Add New Project] dialog Visual Basic > Windows > Windows Forms Application
Name the project: MyApplication


Windows-Form-Application
211829


Locate the solution explorer window and select MyApplication project.
Right click and choose from the [menu] Add > New Item...
Choose from the [Add New Item] dialog Common items > Code > Module
Name the module: Elevation

 
Elevation Module
211828


Locate the solution explorer window and select the Solution 'My Application'
Right click and choose from the [menu] Add > New > Project...
Choose from the [Add New Project] dialog Visual Basic > Windows > Class Library
Name the project: COMAdmin

 
COMAdmin
211830


Under the COMAdmin project class1.vb is created by default. Right click and choose Delete.
Locate the solution explorer window and select COMAdmin project.
Right click and choose from the [menu] Add > New Item...
Choose from the [Add New Item] dialog Common items > Code > COM Class
Name the COM Class: UACAdmin

 
UACAdmin
211831


Locate the solution explorer window and select COMAdmin project.
Right click and choose from the [menu] Add > New Item...
Choose from the [Add New Item] dialog Common items > Code > Module
Name the module: UACRegister

 
UACRegister
211834


Locate the solution explorer window and select COMAdmin project.
Right click and choose from the [menu] Add > New Item...
Choose from the [Add New Item] dialog Common items > General > Installer Class
Name the class: UACAdminInstaller


UACAdminInstaller
211835


  • From the COMAdmin project do the following:


Right click UACAdminInstaller and choose View Code
Add the following source code to UACAdminInstaller.vb
1:
2:
3:
4:
5:
6:
7:
8:
9:
10:
11:
12:
13:
14:
15:
16:
17:
18:
19:
20:
21:
22:
23:
24:
25:
26:
27:
28:
29:
Imports System.ComponentModel
Imports System.Configuration.Install
Imports System.Runtime.InteropServices

Public Class uacAdminInstaller
Inherits Installer

Public Sub New()
MyBase.New()
InitializeComponent()
End Sub

_
Public Overloads Overrides Sub Install(ByVal stateSaver As System.Collections.IDictionary)
MyBase.Install(stateSaver)
Dim RegServices As New RegistrationServices
RegServices.RegisterAssembly(MyBase.GetType().Assembly, AssemblyRegistrationFlags.SetCodeBase)
End Sub

_
Public Overloads Overrides Sub Uninstall(ByVal savedState As System.Collections.IDictionary)
MyBase.Uninstall(savedState)
Dim RegServices As New RegistrationServices
RegServices.UnregisterAssembly(MyBase.GetType().Assembly)
End Sub

End Class


Right click UACRegister and choose View Code
Add the following source code to UACRegister.vb
1:
2:
3:
4:
5:
6:
7:
8:
9:
10:
11:
12:
13:
14:
15:
16:
17:
18:
19:
20:
21:
22:
23:
24:
25:
26:
27:
28:
29:
30:
31:
32:
33:
34:
35:
36:
37:
38:
39:
40:
41:
42:
43:
44:
45:
46:
47:
48:
49:
50:
51:
52:
53:
54:
55:
56:
57:
58:
59:
60:
61:
62:
63:
64:
65:
66:
67:
68:
69:
70:
71:
72:
73:
74:
75:
76:
77:
78:
79:
80:
81:
82:
83:
84:
85:
86:
87:
88:
89:
90:
Imports System.Runtime.InteropServices
Imports System.Reflection
Imports Microsoft.Win32


Namespace UserAccountControlRegister

Module uacRegister

Public Sub UacRegisterElevations(ByVal ComClassId As String, ByVal ResourceStringId As Integer)

Dim ComAppId As String = GetExecAssemblyGuid()
Dim ComLocation As String = GetExecAssemblyLocation()
Dim ComPermission() As Byte = GetAccessPermissions()

Dim RegElevation1 As RegistryKey = Registry.ClassesRoot.OpenSubKey("CLSID\{" & ComClassId & "}", True)
RegElevation1.SetValue(ElevationStrings.AppId, "{" & ComAppId & "}", RegistryValueKind.String)
RegElevation1.SetValue(ElevationStrings.LocalizedString, "@" & ComLocation & ",-" & ResourceStringId.ToString, RegistryValueKind.String)
RegElevation1.CreateSubKey(ElevationStrings.Elevation)
RegElevation1.Close()

Dim RegElevation2 As RegistryKey = Registry.ClassesRoot.OpenSubKey("CLSID\{" & ComClassId & "}\Elevation\", True)
RegElevation2.SetValue(ElevationStrings.Enabled, 1, RegistryValueKind.DWord)
RegElevation2.Close()

Dim RegElevation3 As RegistryKey = Registry.ClassesRoot.OpenSubKey("AppID\", True)
RegElevation3.CreateSubKey("{" & ComAppId & "}")
RegElevation3.Close()

Dim RegElevation4 As RegistryKey = Registry.ClassesRoot.OpenSubKey("AppID\{" & ComAppId & "}", True)
RegElevation4.SetValue(ElevationStrings.DllSurrogate, "", RegistryValueKind.String)
RegElevation4.SetValue(ElevationStrings.AccessPermission, ComPermission, RegistryValueKind.Binary)
RegElevation4.Close()

End Sub

Friend Function GetAccessPermissions() As Byte()
Dim pSd As IntPtr
Dim pSdLength As IntPtr
Dim pSdBytes() As Byte = Nothing
Dim lpszSDDL As String = "O:BAG:BAD:(A;;0x3;;;IU)(A;;0x3;;;SY)"
If UnSafeNativeMethods.ConvertStringSecurityDescriptorToSecurityDescriptor(lpszSDDL, UnSafeNativeMethods.SDDL_REVISION_1, pSd, pSdLength) Then
ReDim pSdBytes(pSdLength)
Marshal.Copy(pSd, pSdBytes, 0, pSdLength)
UnSafeNativeMethods.LocalFree(pSd)
End If
Return pSdBytes
End Function

Friend Function GetExecAssemblyGuid() As String
Dim id As [Assembly]
Dim Attributes As Object
id = [Assembly].GetExecutingAssembly
Attributes = id.GetCustomAttributes(GetType(GuidAttribute), False)
Return (DirectCast(Attributes(0), GuidAttribute).Value).ToString
End Function

Friend Function GetExecAssemblyLocation() As String
Return [Assembly].GetExecutingAssembly().Location.ToString
End Function

End Module


End Namespace


Friend Module ElevationStrings

Friend LocalizedString As String = "LocalizedString"
Friend DllSurrogate As String = "DllSurrogate"
Friend AccessPermission As String = "AccessPermission"
Friend Elevation As String = "Elevation"
Friend Enabled As String = "Enabled"
Friend AppId As String = "AppId"

End Module


Friend Module UnSafeNativeMethods
Friend Const SDDL_REVISION_1 = 1
_
Friend Function ConvertStringSecurityDescriptorToSecurityDescriptor(<[In]()> ByVal StringSecurityDescriptor As String, <[In]()> ByVal StringSDRevision As UInt32, ByRef SecurityDescriptor As IntPtr, ByRef SecurityDescriptorSize As IntPtr) As Boolean
End Function
_
Friend Function LocalFree(<[In]()> ByVal hMem As IntPtr) As IntPtr
End Function
End Module


Right click UACAdmin and choose View Code
Add the following source code to UACAdmin.vb
1:
2:
3:
4:
5:
6:
7:
8:
9:
10:
11:
12:
13:
14:
15:
16:
17:
18:
19:
20:
21:
22:
23:
24:
25:
26:
27:
28:
29:
30:
31:
32:
33:
34:
35:
36:
37:
38:
39:
40:
41:
42:
43:
44:
45:
46:
47:
48:
49:
50:
51:
52:
53:
54:
55:
56:
57:
58:
Imports System.Runtime.InteropServices
Imports COMAdmin.UserAccountControlRegister '// see [UACRegister.vb]

_
Public Class UACAdmin

#Region "COM GUIDs"
' These GUIDs provide the COM identity for this class
' and its COM interfaces. If you change them, existing
' clients will no longer be able to access the class.
Public Const ClassId As String = "805509c5-bd55-4e70-a9b5-cf8438214ebd"
Public Const InterfaceId As String = "62314a44-0740-4afc-9849-792d37371c91"
Public Const EventsId As String = "a38756ce-6a35-4d5f-b8ac-c545dfb80266"
#End Region

' A creatable COM class must have a Public Sub New()
' with no parameters, otherwise, the class will not be
' registered in the COM registry and cannot be created
' via CreateObject.
Public Sub New()
MyBase.New()
End Sub

Public Sub Admin_CreateRootFile(ByVal szPath As String, ByVal szLineToWrite As String)

' TODO:
' Administrative task small example
Dim fs As New IO.StreamWriter(szPath)
fs.WriteLine(szLineToWrite)
fs.Close()

End Sub

End Class


Public Class ComRegisterFunction

_
Friend Shared Sub RegisterFunction(ByVal t As Type)
' TODO:
' This registers the COM Class with elevation, only need to specify
' Class ID and Resource ID. The hard part is handled in UACRegister.vb
uacRegister.UacRegisterElevations(UACAdmin.ClassId, 100)

MsgBox("RegisterFunction:[OK]" & vbCrLf & "Remove this debug message.[UACAdmin.vb]", MsgBoxStyle.SystemModal)
End Sub

_
Friend Shared Sub UnregisterFunction(ByVal t As Type)

MsgBox("UnregisterFunction:[OK]" & vbCrLf & " Remove this debug message.[UACAdmin.vb]", MsgBoxStyle.SystemModal)
End Sub

End Class


Right click COMAdmin project and choose from the [menu] > Build


  • From the MyApplication project do the following:


Right click MyApplication project and choose Properties
Locate the References tab then click on the Add.. button. 
Locate COMAdmin and add it as a reference to the MyApplication project.

Right click Elevation and choose View Code
Add the following source code to Elevation.vb
1:
2:
3:
4:
5:
6:
7:
8:
9:
10:
11:
12:
13:
14:
15:
16:
17:
18:
19:
20:
21:
22:
23:
24:
25:
26:
27:
28:
29:
30:
31:
32:
33:
34:
35:
36:
37:
38:
39:
40:
41:
42:
43:
44:
45:
46:
47:
48:
49:
50:
51:
52:
53:
54:
55:
56:
57:
58:
59:
60:
61:
62:
63:
64:
65:
66:
67:
68:
69:
70:
71:
72:
73:
74:
75:
76:
77:
78:
79:
80:
81:
82:
83:
84:
85:
86:
87:
88:
89:
90:
91:
92:
93:
94:
95:
96:
Imports System
Imports System.Threading
Imports System.Security.Principal
Imports System.Security.Permissions
Imports System.Runtime.InteropServices


Namespace UserAccountControl

Module Elevation

Public Function CreateElevatedComObject(ByVal comclsid As Guid, ByVal comiid As Guid) As Object
' Executes a COM method with administrative rights.
Dim comClsidDirective As String = comclsid.ToString("B") ' use format directive {GUID}
Dim bo3 As New UnsafeNativeMethods.BIND_OPTS3
Dim comObj As Object = Nothing
Dim szmoniker As String = "Elevation:Administrator!new:" & comClsidDirective
bo3.cbStruct = Marshal.SizeOf(bo3)
bo3.hwnd = IntPtr.Zero
bo3.dwClassContext = UnsafeNativeMethods.CLSCTX_LOCAL_SERVER
Try
comObj = CoGetObject(szmoniker, bo3, comiid)
Catch
comObj = Nothing
End Try

Return comObj
End Function

Public Function CreateElevatedProcess(ByVal FileName As String, ByVal param As String) As Process
' Launches a processes using RunAs verb.
Dim psi As New ProcessStartInfo()

psi.UseShellExecute = True
psi.WorkingDirectory = Environment.CurrentDirectory
psi.FileName = FileName
psi.Verb = "runas"
psi.Arguments = param
psi.ErrorDialog = True

Return Process.Start(psi)
End Function

Public Sub Button_SetElevationRequiredState(ByVal this As IntPtr, ByVal bShow As Boolean)
' Adds shield icons to buttons/links or command links
UnsafeNativeMethods.SendMessage(this, BCM_SETSHIELD, IntPtr.Zero, New IntPtr(If(bShow, 1, 0)))
End Sub

Public Function IsAdminRole() As Boolean
Dim myPrincipal As WindowsPrincipal = CType(Thread.CurrentPrincipal, WindowsPrincipal)
Dim sid As New SecurityIdentifier(WellKnownSidType.BuiltinAdministratorsSid, Nothing)

Return myPrincipal.IsInRole(sid)
End Function

Public Function IsElevatedOs() As Boolean
Dim v As OperatingSystem
v = Environment.OSVersion
Return If(v.Version.Major >= 6, 1, 0)
End Function

End Module

End Namespace


Friend Module UnsafeNativeMethods

Friend Const CLSCTX_LOCAL_SERVER As UInteger = &H4
Friend Const BCM_SETSHIELD As UInteger = &H160C

' Windows Vista and above structure.
_
Friend Structure BIND_OPTS3
Dim cbStruct As UInteger
Dim grfFlags As UInteger
Dim grfMode As UInteger
Dim dwTickCountDeadline As UInteger
Dim dwTrackFlags As UInteger
Dim dwClassContext As UInteger
Dim locale As UInteger
Dim pServerInfo As Object
Dim hwnd As IntPtr
End Structure

_
Friend Function CoGetObject(ByVal pszName As String, <[In]()> ByRef pBindOptions As BIND_OPTS3, <[In](), MarshalAs(UnmanagedType.LPStruct)> ByVal riid As Guid) As Object
End Function

_
Friend Function SendMessage(ByVal hWnd As IntPtr, ByVal Msg As UInt32, ByVal wParam As IntPtr, ByVal lParam As IntPtr) As IntPtr
End Function

End Module


Double click Form1, from the toolbox add a new Button to the form.(Button1) by default.
Add the following source code to Form1
1:
2:
3:
4:
5:
6:
7:
8:
9:
10:
11:
12:
13:
14:
15:
16:
17:
18:
19:
20:
21:
22:
23:
24:
25:
26:
27:
28:
29:
30:
31:
32:
33:
34:
35:
36:
37:
38:
39:
40:
41:
42:
43:
44:
45:
46:
47:
48:
49:
50:
51:
52:
53:
54:
55:
Imports MyApplication.UserAccountControl
Imports COMAdmin

' Visual Studio 2008 .NET 3.5
' TODO: You can start building your application from here
' with user account control elevations ready to be
' used with your new application.
' NOTE: Don't forget to add a reference to [COMAdmin.dll] in
' this application project.
' NOTE: You must have full edition to take advanatage of the
' setup installer project. The Express editions don't
' have visual studio installer templates.

Public Class Form1

Private Sub Form1_Load(ByVal sender As System.Object, ByVal e As System.EventArgs) Handles MyBase.Load

' TODO: Example that adds a shield icon to the button
' informing the user the action requires elevated
' user rights.
Button1.FlatStyle = FlatStyle.System
Elevation.Button_SetElevationRequiredState(Button1.Handle, True)

End Sub

Private Sub Button1_Click(ByVal sender As System.Object, ByVal e As System.EventArgs) Handles Button1.Click

Dim clsid As Guid = New Guid(COMAdmin.UACAdmin.ClassId)
Dim iid As Guid = New Guid(COMAdmin.UACAdmin.InterfaceId)

If Elevation.IsElevatedOs Then

Dim comRef As UACAdmin._UACAdmin = Nothing ' Interface
comRef = Elevation.CreateElevatedComObject(clsid, iid)
If IsNothing(comRef) <> True Then
' admin::task
comRef.Admin_CreateRootFile("c:\uac.txt", "working")

End If

Else

If Elevation.IsAdminRole Then
' admin::task
Dim comRef As New UACAdmin
comRef.Admin_CreateRootFile("c:\uac.txt", "working")
End If

End If

End Sub

End Class


When you have finished choose from the Visual Stuido IDE [menu] Build > Build Solution.


2
Creating and Embending Win32 resource into VB.NET

There is a few things you need to do before elevation can take place. The first is that the DLL needs to have a Win32 Resource string embended inside the DLL. This resource string is what will be displayed on the UAC prompt if it is enabled.
 
uacprompt
211860


Locate your projects directory under windows. 
example: C:\Documents and Settings\User\My Documents\Visual Studio 2008\Projects\MyApplication
Create a new folder named: Win32Resource

Create a new text file named: resource.h
Add the following:
1:
2:
#define IDS_ELEVATION 100


Create a new text file named:ElevationPrompt.rc
Add the following:
1:
2:
3:
4:
5:
6:
7:
#include "resource.h"

STRINGTABLE
BEGIN
IDS_ELEVATION "My Application"
END


Create a new file named: ElevationPrompt.bat
Add the following:
1:
2:
rc.exe ElevationPrompt.rc


Copy RC.EXE to the same location. You may also need to copy its dependancy RCDLL.DLL
Run ElevationPrompt.bat a new file should be created named ElevationPrompt.res
 
Win32ResourceFolderContents
211840


Copy the file ElevationPrompt.res file into the COMAdmin project folder located in the root of your project solution.
 
ElevationPromptResource
211841


Under the same location right click COMAdmin.vbproj and choose Open With > Notepad
Add the following line to the member:
1:
2:
ElevationPrompt.res


ComAdminWin32ResourceAppend
211845


Save the changes to ComAdmin.vbproj . The VB.NET IDE should detect the change when presented with the dialog just click 'Reload'

When you have finished choose from the Visual Studio IDE [menu] Build > Rebuild Solution.

The steps described for adding the line to the project file are used for VB.NET projects. The VB.NET IDE doesn't have a direct option for adding true Win32 resources to projects. You must follow the steps described to embend the string resource into the DLL for VB.NET.
Note: C# projects can directly add resource files under the Properties > Application tab section.


3
Creating a Setup Installation package that automatically installs and registers the COM class


Locate the solution explorer window and select Solution 'My Application'.
Right click and choose from the [menu] Add > New > Project...
Choose from the [Add New Project] dialog Other Project Types > Setup and Deployment > Setup Project
Name the setup project: MyApplicationDeployment
 
MyApplicationDeployment
211846


  • From the MyApplicationDeployment project do the following:


Locate the solution explorer window and select MyApplicationDeployment project.
Right click and choose from the [menu] Add > File...
Add the COMAdmin.dll file from the dialog.
Example: C:\Documents and Settings\User\My Documents\Visual Studio 2008\Projects\MyApplication\MyApplication\bin\Debug\COMAdmin.dll

Right click and choose from the [menu] Add > File...
Add the MyApplication.exe file from the dialog.
Example: C:\Documents and Settings\User\My Documents\Visual Studio 2008\Projects\MyApplication\MyApplication\bin\Debug\MyApplication.exe

Right click and choose from the [menu] View > Custom Actions...
Right click the Install folder and choose Add Custom Action...
When the dialog appears double click the Applications Folder option.
Select the COMAdmin.dll and choose OK.

Repeat the following steps above for the Uninstall folder.
Right click the UnInstall folder  and choose Add Custom Action...
When the dialog appears double click the Applications Folder option.
Select the COMAdmin.dll and choose OK.
 
 
CustomActions
211847


ProjectOverview
211849


Right click the MyApplicationDeployment project.
Choose from the [menu] Build.

Visual Studio should have created a setup (MSI) package.

You can download the solution project template here. Everything that has been discussed in the tutorial can be located in the project.